


This post may contain affiliate links, sponsored content, and referral links. You can read our Disclosure Policy Here!

Spring is upon us, and who doesn't love Chocolate Bunnies. Even if you can't eat this one, it couldn't be any cuter. The perfect little bunny to display for this upcoming month. Below you will find how I made this cute "chocolate" bunny.
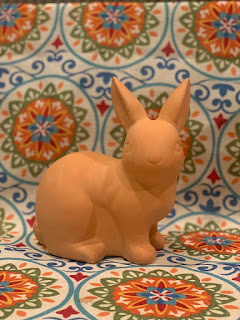
To get this exact bunny, check your local Target. You can find it in the "Dollar" spot up front. It is $3.00.


Please remember to let each coat dry completely before applying the next. You want to have a smooth finish.
To get this exact bunny, check your local Target. You can find it in the "Dollar" spot up front. It is $3.00.

Next head over to your local store that sells spray paint. You need to grab a can of Expresso Brown in a satin finish. I went to my local Lowes for my can.

When spraying your bunny, spray away with even strokes. This bunny will need three coats of paint. You need to allow each coat to dry completely before applying the next.
The very first coat will dry and leave a mute finish. ( see photo below) Once you apply the second and third coat this will go away.

Please remember to let each coat dry completely before applying the next. You want to have a smooth finish.
It looks so great you might even want to eat it.
 |
| Please do not eat. This is not food. Photo for humor. * |
The end result of your hard work is this cute "chocolate" bunny.
The total cost of the project for two bunnies was about $10.00.
A great addition to your April decor.

This is our first Easter craft of the month. We hope to do many more and share them with you!

No comments:
Post a Comment